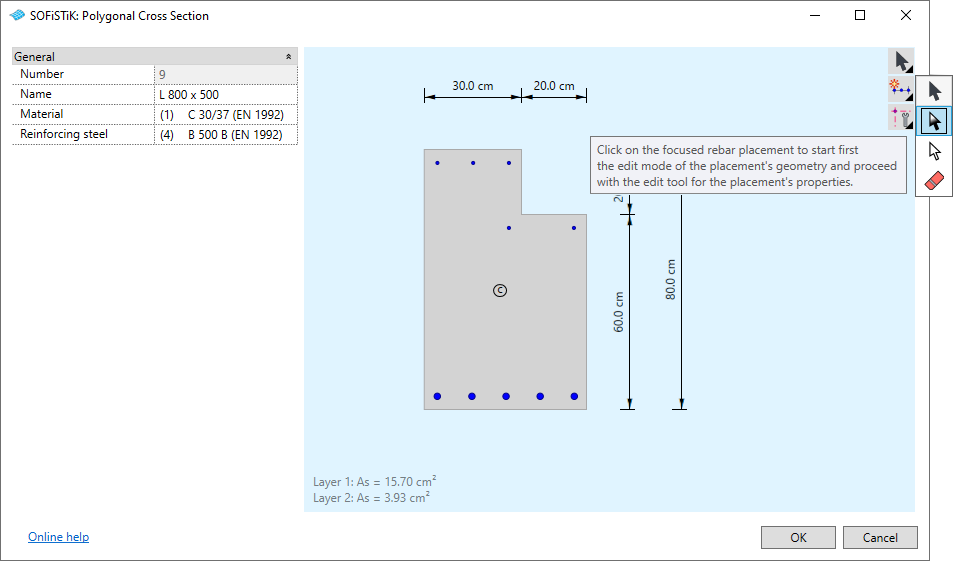
Polygonal Section Dialog#
The polygonal section dialog allows you to visualise and adjust section properties and reinforcement.
Polygonal sections have a polygon as contour and do not correspond to SOFiSTiK Standard Sections. If such a cross section is present in the Cross Section Mapping dialog or in the Tab Cross Section of SOFiSTiK Project Settings, the user can click on Edit to open the polygonal section dialog, see below.
Note
If no such cross section is present, it can be created by the following means:
Duplicate an existing Standard SOFiSTiK Section and activate Convert to Polygonal Cross Section
Import such polygonal cross sections from a different existing database (
*.cdb)Open the corresponding SOFiSTiK project via , then create a new cross section with the Cross Section Editor in
SOFiPLUS(-X)

The left side of the dialog displays the properties of the cross section for checking and adjustment.
Note
For cross sections auto-generated by SOFiSTiK Analysis + Design, the assignment of materials is strictly handled by the material mapping. For user-defined modifications, please clone this cross section.
The workspace of the dialog displays the cross section geometry and dimensions as well as longitudinal reinforcement, when present in the cross section.
When the reinforcement is allowed in the cross section, icons are displayed on top right corner of the workspace. They enable to choose actions. The triangle at the corner of each action icon provides access to the different variants of the action. With these actions, the user can:
Adujst the properties and geometry of exiting reinforcement placements
Create new reinforcement placement of various types
Create and adjust auxiliary lines and points to facilitate the definition of reinforcement placements
By clicking on a reinforcement placement, a panel opens allowing you to adjust its properties. The following properties can be adjusted and/or checked (from left to right, top to bottom):

Quantity of reinforcement bars (not for single reinforcement)
Diameter of the bars
Bars center to center distance (not for single reinforcement)
Total reinforcement quantity of the placement
Type of bar distribution (not for single reinforcement)
Torsional contribution (not for single reinforcement)
Distance from the center line of the reinforcement to the contour of the section (click on the arrow to toggle to other segments of the contour)
ID number of the reinforcement layer to which the placement belongs
Note
In the bottom left corner of the workspace, the total quantity of reinforcement is displayed for each layer in the cross section.
Tip
You can combine the Import function of SOFiSTiK Project Settings with the Polygonal Section Dialog for an easier handling of cross sections in your Revit project.